DIY finger puppet theater
If you want to develop your baby’s fine motor skills, speech, thinking and simply be able to lift the mood of the whole family, then turn the room into a temple of art. To do this, you need to know how to make a finger puppet theater with your own hands.
For this you will need:
- felt;
- threads;
- scissors.
As you can see, the characters in the fairy tale “Turnip” are cut out very simply.
Each hero consists of two identical parts. But on one side you need to embroider facial features with threads. You can make them by cutting them out of dark felt and then gluing or sewing them on. Fold 2 character blanks with the wrong sides together, sew along the edge using a machine or with a thread and a needle on your hands.
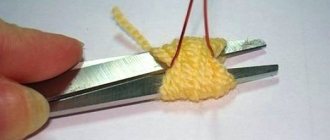
To make a beard for your grandfather, wrap several rows of thread around your fingers and cut them on one side. Fold these identical threads in half and sew the beard in place.
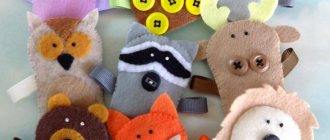
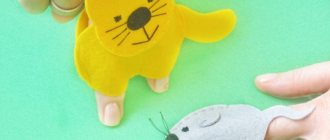
And here’s what the heroes of the fairy tale “The Ryaba Hen” might be like. Cut out your grandfather's beard and bangs and grandmother's hair from gray felt. It will also help you create a mouse with a long tail. These are the kind of dolls you can sew for a puppet theater. If a baby will wear them, cut them so that they are the size of his fingers. If the performance will be performed for children by adults, then the fabric dolls should be slightly larger.
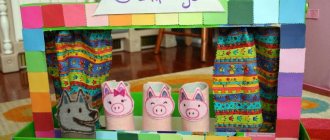
Check out another interesting idea. This could be a home puppet theater for staging the fairy tale “Turnip”. In kindergarten, it is better to have larger characters so that the whole group can see them from afar. But you can do something like this by taking:
- modeling paste (preferably Jovi, which does not need to be burned; it hardens in air);
- yellow and green paste Jovi Patcolor;
- acrylic paints;
- tassels;
- markers;
- stacks.
- Let's sculpt the grandfather first. Take a piece of pasta measuring 2x3 cm, roll it into a sausage, and form a cylinder. You should end up with something like a nesting doll with a body and head, and at the bottom there will be a notch for your finger.
- Separately sculpt the arms and attach them to the body. But outline the facial features, beard, and mustache using a stack.
- Using the same principle, sculpt the grandmother, granddaughter and animals. Once these characters are dry, paint them with acrylic paints.
- For the turnip, roll a ball of yellow paste, pull it out a little from the top, insert green plastic tops here, and secure.
When sculpting with paste, you will find that it dries quickly in the air, so periodically wet your fingers with water.
This is how you will get a finger puppet theater; with your own hands, a child will be able to act out the fairy tale “Turnip” or come up with his own plot with some of these characters.
Crafts from plastic spoons and forks - Manual “Theater on Spoons”
Publication “Manual “Theater on ...”
Manual "Theater on Spoons". Goal: introducing preschoolers to theatrical activities. Puppet theater plays a huge role in the moral and aesthetic education of preschool children. Theatrical and play activities of children are important both for the development of cognitive activity and...
Image library "MAAM-pictures"
Master class from waste material “Fan of forks”
Today I want to tell you how you can make a fan from disposable forks. Such a fan can be used as a gift for any holiday or to decorate your home interior. The word “fan” comes from the verb “to win” - “to blow, to blow with a breath.” There are several legends...
Master class “The second life of waste material. Making dolls from plastic spoons"
Master class “The second life of waste material. Making dolls from plastic spoons" Hello dear colleagues! I would like to share my experience of making dolls from plastic disposable spoons. We all know very well the enormous harm plastic causes to our...
Master class on crafts made from a plastic spoon “Funny Bunny”
Master class “Funny Bunny” Subbotina Tatyana Mikhailovna. On the topic “Wild Animals”, I propose to make a funny bunny with children 3-4 years old. For this craft you need: plastic disposable spoons, cotton pads (three for one bunny, scissors, glue - pencil, marker,...
Crafts from plastic spoons and forks - Master class on plasticine printing on spoons
Article “Master class on plasticineography on...”
Modeling is one of the favorite types of visual arts for children of all ages. Modeling develops imagination, fantasy, fine motor skills, spatial thinking, develops coordination of both hands, helps to understand and remember colors, shapes of objects, obtain...
Master class “Teaching playing on spoons” Master class by Liliya Gennadievna Gudzenko, music director of the highest qualification category “Teaching playing on spoons” Introduction of innovative experience “Teaching playing on spoons as a means of developing the speech motor sphere of children” Form of delivery: pedagogical workshop….
Master class “Teaching playing on spoons” Master class by Liliya Gennadievna Gudzenko, music director of the highest qualification category “Teaching playing on spoons” Introduction of innovative experience “Teaching playing on spoons as a means of developing the speech motor sphere of children” Form of delivery: pedagogical workshop….
Master class “Theater on Spoons” for children of the first junior age
Master class “Theater on Spoons” Master class of didactic games for theatrical activities based on the fairy tale “Zayushkina’s Hut” for children of the first junior age Albina Nurpeisova Master class is designed for educators and parents Purpose: for theatrical…
Pages: …
DIY table theater
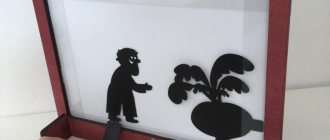
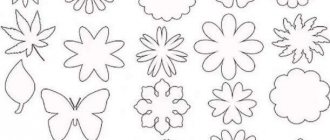
If you want to have a tabletop theater with paper dolls, then enlarge the following image. Print it on a color printer on thick paper. If this is not possible, attach a sheet of thin paper to the screen and transfer the outlines onto it. Then place it on cardboard, draw outlines, and let the child decorate the characters with colored pencils or paints. All that remains is to cut out the images, glue each on the side and glue the top of the head to the head.
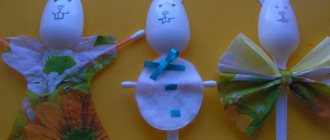
And here are some more templates that can be used to easily make theater dolls. With your own hands or by giving the blanks to your child, cut them along the contours and glue them in pairs. If a small rectangular sheet of colored paper is glued on the side, you get a small tube. It should be such that it fits well on your finger. Glue the ears, nose, eyes, front paws to the blank, and you will get a finger puppet theater hero. These characters can be made from the most unexpected materials. See how to turn plastic spoons into stage plays. To make these toys for the puppet theater, take:
- plastic spoons;
- colored paper;
- scissors;
- ready-made plastic eyes;
- glue gun;
- textile;
- narrow tape, scissors.
Next follow these instructions:
- Using a glue gun, glue the finished eyes to the convex side of the spoon.
- Turn a piece of fabric tied with a ribbon into a dress. For a male character, just glue a bow tie to his neck.
- Cut strips of colored fringe paper on one side and glue this hair. They will also be replaced by pieces of colored cotton wool.
That's it, the children's puppet theater at home is ready.
Take a large cardboard box, cover it with colored paper, and turn it over. Make slits in the bottom with a knife, insert spoons here and move the dolls along these holes, like along a path. Other characters are controlled in the same way, to create which you will need:
- ice cream sticks;
- children's magazines;
- glue;
- scissors.
Let the child cut out pictures of people and animals from a magazine or an old book and paste them on sticks. If you want to make another tabletop theater, then milk bottle caps will come into play. Plastic yogurt cups. Glue paper fairy tale characters to the back of these items, and you can play out old stories with them or invent new ones. The background is created from a large sheet of cardboard, which is painted to match the theme.
Tulips made from plastic spoons
You will need: 4 pairs of plastic spoons (for one tulip), cocktail straws, a disposable plate, a green plastic bottle, a wooden skewer, a candle and scissors.
Master Class
- Cut off the top of the spoon.
- Place the spoons overlapping each other over the candle.
- Form the bud in the same way.
- Cut out the blanks for the stamens from the plate.
- Attach them to a skewer.
- Cut a hole for the stem.
- Thread a cocktail tube through as a stem.
- Thread the skewer through the stamens.
- Cut a leaf from a plastic bottle and attach it to the stem.
- Make a whole bouquet of these tulips.
How to make a screen for a puppet theater?
This is an essential attribute of puppet theater. Check out the simplest options:
- Cover the hole under the table with a cloth, tying its two corners to the top of one and the other leg. The child sits on the floor behind him and leads the characters at the level of the table top - just above it.
- Take an old curtain or sheet. Gather any of these fabrics onto a rope, tie the ends of the thread on one and the other side of the doorway. Make a rectangular cutout in the center of the top of any of these pieces. It should be at such a height that it is not visible to a child or adult sitting behind the curtain who are playing the role of puppeteers.
- A tabletop screen is made for the finger theater. The easiest way is to make it from cardboard. Take the box. It needs to be disassembled, covered with wallpaper or colored paper, and 2 sides bent so that a canvas of sufficient size remains in the center. There is a cutout in it through which the puppeteer shows finger toys.
Here's how to make a plywood screen. For it you will need:
- plywood;
- jigsaw;
- fabric or piece of wallpaper;
- glue;
- small door hinges.
Manufacturing instructions:
- Based on the presented dimensions, cut out 3 blanks from plywood: a central one and 2 side panels. Cover them with fabric.
- When the canvas is dry, attach the loops to the designated areas so that you can close the puppet theater screen and fold it.
See how to make a screen out of cardboard so you can show performances with mitten, glove, and cane puppets.
It should be such that the puppeteer can fit there freely, standing up to his full height. If the performance is performed by children of different ages, then the tall ones will kneel, placing a pillow under them. In order to make a screen, you will need:
- PVA glue;
- rope or lace;
- carton boxes;
- wallpaper;
- stationery knife;
- awl;
- roulette;
- wide brush;
- long ruler;
- rag.
You can make a screen for a puppet theater with your own hands as follows:
- The drawing is given for teenagers or adults whose height is 1 m 65 cm. If you are making a screen for children, reduce this figure.
- To make it durable, make it three-layer. To do this, stick a second one on one large sheet of cardboard, then a third one on the other side. Apply PVA glue with a wide brush. This way you will make the front part - the apron.
- The side elements are also made in three layers, but the folds, which you then glue to the apron, should consist of one layer.
- Connect the parts by gluing them. When the glue has dried, sew in these places with a lace, having previously made holes in the fastening points. Attach the top arch in the same way.
All that remains is to cover the screen with wallpaper of a dim color so that it does not distract from the theatrical performance.
Pineapple made from plastic utensils
An original piece of decoration in a child's room. It is easy to make, practical and fits into almost any room interior. To make it you will need: an oval lamp, a glue gun, spoons, yellow gouache, a knife, green cardboard, a bottle.
We cut out a cylinder from the bottle, cutting it off on both sides. We paint the devices in a yellow shade, after cutting them and leaving only the top side. We take the deep sides of the tools and attach them to the bottom row.
Glue another layer to cover the gaps between the petals. Thus, we glue the entire bottle. We make leaves from green cardboard and glue them to the base of the bottle. Finally, place the pineapple on a suitable lamp.
Other options
If your CD is not scratched, then you can not hide it in cardboard and glue it entirely, and then simply decorate it.
You can use satin ribbons more densely, and fill the free space with them in a checkerboard pattern.
By the way, here is another version of the New Year's fan. A typical attribute of this holiday is used - tinsel.
There are colored forks in stores, so if they match the chosen color scheme, feel free to use them.
In general, when it comes to decorating the fan itself, you can use all the techniques you know. For example, very elegant flowers are made from satin ribbons; the method of creation is called kanzashi. If you have the skills to work in this technique, you will find another use for it, and if this is new to you, you will acquire new knowledge.
As you can see, creating the base of the forks is, in principle, simple and monotonous. But decorating the product will allow the craftswoman to demonstrate all her knowledge, skills and imagination. Ribbons, lace, various yarns, beads, beads, rhinestones, feathers and much, much more - everything that is at hand can become part of amazing creations. And believe me, no one can pass by such creativity indifferent.
Watch
A wall clock in the shape of a sun will look very beautiful and impressive.
To create them you will need:
- Three hundred pieces of plastic spoons.
- Hot glue gun.
- Styrofoam.
- Scissors.
- Watch.
- Screwdriver and bolts.
- Knife (preferably stationery).
How to proceed:
- Cut out a foam circle in the shape of a clock.
- The middle needs to be marked so you know where to attach the clock. Make special holes for changing batteries, winding watches, etc.
- The bottom of the spoons should be cut off to leave just the cups and painted orange or yellow.
- Paste the clock in a circle, leaving no empty spaces.
Steps for creating ladybugs from disposable spoons
Performing such crafts will certainly be very interesting for children, but some manipulations can only be done with adults.
- All spoons need to have their handles cut off, but it is best to do this after the spoons have been painted and the paint has dried.
- One spoon should be painted black, and two should be painted red. For red spoons you need to add black dots.
- To create the “head” of a ladybug, you need to put 2 white dots on the lid or button.
- We glue the “insect” - two red spoons are glued onto a black spoon in an A-shape - the “wings” of a ladybug.
- Glue a button or lid to the base of the structure. And here we have the cutest craft, which will take no more than 10 minutes to make.
Any craft made from plastic spoons is always attractive for its simplicity and at the same time beauty. No special tools are required for production, and almost every craft can be completed even by the youngest inventors.
You can absolutely not limit your imagination and go beyond the master classes you study, creating unique products. In addition, such crafts can be incredibly useful in everyday life, which makes them especially valuable.
https://youtube.com/watch?v=hMNGw4PaAUs
https://youtube.com/watch?v=VJS1rjKZMxw
Palm tree - an exotic garden decoration
A palm tree made from plastic bottles will help add a touch of the tropics to your dacha. Making such a garden decoration item is not difficult, the main thing is to follow the sequence of steps. First you need to prepare the materials: a large number of brown and green plastic bottles, a stationery knife, tape, a tube for decorating the barrel and a thick rope. The master class looks like this step by step:
- Creating leaves.
- Creating a trunk.
- Assembly of all parts of the structure.
To make a palm tree crown, you need to cut off the bottom of green bottles, and cut the upper part into small strips and bend them in the other direction. There is no need to touch the lid and neck. Depending on the number of bottles, the palm will be thicker or vice versa. After this, you need to take brown bottles, cut off the bottom and make stripes from it towards the neck. There should also be a lot of bottles. To assemble the tree, a rope is tied to each lid, secured inside. The palm tree will serve as an excellent decoration for an inconspicuous corner on the site.
New Year's crafts from plastic spoons
When the New Year's mood is clearly expressed in the house and you want to fill the whole house with holiday, release your energy while spending pleasant time with your little family members by making wonderful Christmas trees from disposable spoons.
This is one of the simplest products; you will need plastic tools, a paper cone, special strength glue, and watercolors. We cut the devices, leaving only the oval parts.
We glue the frame, placing rows on top of each other. At this stage, everything is ready and, if desired, you can decorate the Christmas tree in any shade. The toy is suitable for a school project or home decoration.
Snowflake
An ordinary snowflake will become a New Year's toy made from disposable spoons, which will decorate the apartment and give it a winter atmosphere. To make such a craft from disposable spoons you will need: a rosette core, a specially strong adhesive, scissors, and a small circle of cardboard.
We cut off the ends of six scoops, place them on a cardboard circle, and glue them together. We take three ladle, cut off everything except the oval component, connect them with the already glued devices.
Glue the core into the center. If possible, decorate with snowflake stickers. Such snowflakes will look great on the New Year tree and add white shades to the apartment.
Water lily
What is needed: spoons (twelve pieces), green and transparent plastic bottles, yellow paint, brush, glue, scissors.
How to do:
- cut off the handles of the spoons;
- glue three cut spoons together;
- glue four cut spoons together;
- Glue three glued spoons to four;
- glue five spoons together and glue the previously glued spoons to them;
- from a transparent plastic bottle, cut out a long strip about 2 cm wide, paint it with yellow paint, let it dry, cut the fringe on one side;
- we fold the resulting fringed strip into several circles and secure it with glue, glue what we got into the middle of the previously made water lily;
- cut out a leaf from a green bottle (you can use a transparent bottle painted with green paint);
- glue the water lily to the leaf.