Nowadays, non-traditional drawing techniques are becoming increasingly popular. What is their advantage? The use of different materials, paints, household items and non-standard techniques allows you to create original works, even in the absence of artistic skills.
And the atmosphere of ease and relaxation, the opportunity to express your emotions, the joy and pleasure received from such activities, removes the fear of the drawing process. Therefore, non-traditional techniques are interesting for children and give excellent results.
A striking example is the Ebru drawing technique. And bright - in the literal sense.
Bright colors of Ebru
So what is this “Ebru Drawing Technique for Preschoolers”?
Ebru is a special drawing technique, because... The work is done with paints not on paper, but on water. Of course, the water is not ordinary, but specially prepared, but the fact remains a fact. The water must be viscous so that the paints do not sink or dissolve in it. Due to the different densities of the liquids used, the drawing process is built: liquid paints adhere to the surface of the base, while allowing various manipulations with them.
Drawing with water for children (this technique is sometimes called as it essentially involves applying one liquid to the surface of another) is an exciting process of creating unique patterns. At the same time, it is a good way to develop creative skills, improve color perception, and develop fine motor skills with minimal stress on children.
Note! In general, the process itself is not complicated, so in preschool educational institutions this technique is applicable to children of any year of birth.
Origin story
The history of Ebru painting goes back so deep that today it is impossible to determine exactly who invented this style. Back in the 12th century in Japan, monks practiced the art of “suminagashi” (floating ink), drawing unique patterns on rice paper.
But Ebru was officially recognized as Turkish technology, because... the first oldest work, dated 1554, is located in Turkey. Turkish masters were very skillful and created not only abstractions, but also more complex compositions. The word “Ebru” itself is translated as “air clouds” and most accurately conveys the essence of the drawing.
Why are children interested in watercolor painting?
Ebru differs from drawing with conventional pencils, paints and felt-tip pens. And you know what? Magic.
The drawing process seems fabulous, enchanting. After all, you are drawing on water, which remains clean even after the paint gets in – only a drawing is created. In addition, even those who create for the first time can draw something beautiful.
Is it possible for children to draw Ebru at home?
After all, this unusual way allows you to keep your little fidget busy for quite a long time.
Despite the complex name and description, there is a more simplified version for home exercises. At home, a base such as milk, 2.5% fat, is perfect. Milk is poured into a bowl, a brush with paint is lowered into the milk. The paint flows down and forms a spot of the desired size around the brush (you can also drip paint from a regular pharmacy pipette). And so on several times.
Then take a stick (toothpick, sushi stick, match) and draw different lines, patterns, etc. You can stop at this stage, because the process itself is fascinating.
Note! But there is an interesting addition: the tip of a cotton swab is moistened with dishwashing liquid and dipped into the center of the plate/container, 2-3 mm deep.
The drawn image immediately begins to change. All that remains is to observe and be surprised!
Drawing on milk
What you will need for drawing on water - materials
Traditional drawing using the Ebru technique requires more careful preparation.
Necessary materials:
1. Thick base.
To create a viscous base, the water needs to be thickened. To do this, you need to dissolve thickeners in it. Special stores sell a variety of thickeners: natural or synthetic, liquid or powder, domestic and imported.
To work in the initial stages, you can prepare the base yourself. There are even several options on the Internet:
- The classic preparation recipe involves the use of Geven mountain thorn extract: dissolve 7-12 g of extract powder in 1 liter of cold water, stirring thoroughly for 20 minutes. Leave for 12 hours and strain before use. This solution can be stored for several months. It becomes unusable if odor and cloudiness appear.
- A more affordable method of preparation is boiling paste. To do this you need starch, water and PVA glue. Make a thin paste from starch and water and let it cool. Then add PVA glue to the paste and mix well so that there are no bubbles.
Didactic games for the development of motor skills and sensory skills in children
Important! The paste should be of medium consistency, because the paints will dissolve in a more liquid form, and not immediately, but after a while the work will be ruined at the completion stage!
Gelling agents such as gelatin and agar-agar are also used. A thin jelly is prepared from them.
2. Paint.
Also available for sale. It is made on the basis of natural pigments, water and bile. The special paint is quite liquid, spreads well, almost tinted water.
When working in a kindergarten, it is more convenient to use acrylic paint or diluted gouache.
3. Container for the base.
This can be any deep dish; a rectangular container is best. The simplest and most budget option is a disposable plate.
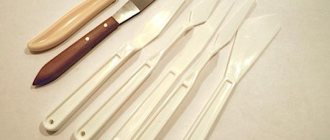
4. Tools for creating a drawing.
Tools: brushes, combs, combs, toothpicks, etc.
Brushes can have different thicknesses, depending on your idea. It is better to give thick brushes to children in kindergarten: it will be more convenient to apply drops with them, and to make paint stains with the opposite end of the brush.
Combs and combs should be suitable for the size of the pallet on which you will be working, or rather, they should be smaller. Using a comb you can create unique patterns in the form of scales. Drawing "scaly" patterns.
Additional Information! If you divide (break) a comb into several parts, you will get a suitable tool, or rather, several tools.
Pointed objects (toothpicks, sushi sticks, knitting needles) are better at drawing small details.
Important! Sharp objects should only be used under adult supervision!
5. Paper for transferring the design.
Any one that is not too dense will do. There is special primer paper on sale.
The technique of drawing Ebru in kindergarten includes the following stages of work.
Liquid preparation
The finished adhesive base is poured into containers.
Note! If bubbles appear, an unnecessary sheet of paper is placed on the surface and after 20-30 seconds it is carefully pulled over the side towards itself.
Batal-ebru-drop pattern
The paints are diluted with water to the desired liquid state and poured into small glasses.
Creating a working background
Paint is drawn onto a brush and splashed over the surface. Spraying: lightly shaking the brush or tapping the edge of the left palm.
These first drops may dissolve, but then they will hold the rest of the paint on the surface, from which the design is directly created.
The background is applied in one color or 2-3, no more.
Shawl-ebru - “scaly” pattern
Creating a background is divided into separate styles, which even have their own names:
- Batal-ebru. An example of this style:
- Shawl-ebru. In this style, the pattern resembles butterfly wings or scales. And also Anatolian scarves (hence the name “shawl”).
- Comb ebru. This is what combs are used for.
Comb ebru
Applying the main drawing
The main task is to create circles on the surface of the water, and then create patterns from them. The brush is dipped into the paint and a few drops drip onto the water. At the same time, they blur, changing their outlines.
Then the creative process begins. Several main directions for further work:
- stretching lines;
- drawing spirals and waves;
- drawing symmetrical flowers: with a sharp tool, draw radii from the edge of the circle to its center;
- drawing a tulip: one radius is drawn, only in the upper part, and the resulting petals are pulled out with the tip of the tool;
Tulips
- drawing complex colors from several colored circles superimposed on each other;
- drawing butterflies;
Organization of a nature corner in kindergartens according to the Federal State Educational Standard
Transferring a drawing to paper
The completed image is transferred to paper. To do this, apply a sheet of paper to the surface. Waiting time 10-15 seconds (up to 10 minutes). If gouache was used, it is better to increase the time (the drawing will be brighter). In some cases, the edges of the paper will begin to lift on their own. The sheet is carefully removed and set aside to dry. It is advisable to place a soft mat underneath.
Additional Information! After creating the drawing, the liquid can be used more than once. For reuse, the remaining paint is removed from the base: a sheet is also placed on water, and all the remaining paint is absorbed. Now new drawings will not contain traces of previous ones.
Drawing radius lines
Sequencing
So, it's time to start drawing. Pour the solution into the prepared container, pour the paints into cups and prepare all the tools.
Drawing on water at home is as follows:
- Creating a background. It is necessary to hold all the paints you apply. Load a brush with paint and spray it all over the surface. Please note that you do not need to dip the brush into the water itself. You can make the background multi-colored, but use no more than 3 shades, as too much color will impair the transfer of the image onto the paper. At this stage you will need a special comb.
- Formation of the main drawing. Drip some paint in the center of the background and shape it into whatever shape you planned using an awl. The simplest thing is to depict a flower. Start with him. A more fanciful ornament requires a certain skill.
- Transfer to paper surface. Gently place the paper on the liquid surface and wait 10 seconds. Then hook the leaf and drag it over the edge of the container. After this, leave your creation to dry.
All that remains is to frame the work.
Secrets of drawing on wood, fabric and other materials
After mastering the Ebru technique on paper, it is possible to create paintings on other materials, or rather, on decorative items from other materials.
The algorithm is similar, but there are some peculiarities.
Textile. It must be taken into account that assistance is required in lowering and raising the fabric.
Ceramics. Ceramics are quite suitable for working in the Ebru technique. This is quite a promising material to work with, with which you can organize a whole cycle of classes from sculpting a ceramic product to decorating it, using the Ebru technique.
Tree. Suitable for Ebru. The product to be painted is rotated evenly to cover it on all sides. Gloves are required for work.
Glass. Complex material, non-porous, paint is not absorbed. A good result is achieved only when using specialized materials and paints.
Reviews
Tatyana, 23 years old
I accidentally saw a set of ebru, I didn’t even know what it was. I just wanted something unusual to distract myself from sad thoughts (there was just a period of stress - breaking up with my boyfriend, problems at work).
I bought it and started drawing – thoughtlessly, automatically. But as a result, I received surprisingly positive, life-affirming pictures. I hung them in frames in a visible place. Now I often look at them and feel reassured. I feel less depressed.
Ivan, 19 years old
I have been interested in the ebru technique for three years now. The pictures look cosmic. I got several of my classmates hooked on this art – they even organized an exhibition with them in the hall of the hostel. But not a simple one, but in the style: “Guess what is shown in the picture.” The success was amazing. Even the commandant took part. It seems that after the exhibition she also bought herself a set of ebrus. But it is not exactly.
And I'll buy it. It's my nephew's birthday soon. It would be a great gift.
Inga, 30 years old
My son is 6 years old. For a very long time he asked to buy him a set of ebru. I didn’t agree - I thought that the whole apartment would be covered in paint and he, like a true artist, would always be in an unwashed state. But no - the paints are easily washed off from your hands, the set’s configuration allows you to store the trays and paints very compactly. But the main thing is that the child is delighted. Feels like a great creator. And I feel a little guilty that I put off the purchase for so long.
After all, the pictures are truly fascinating.