Work algorithm
There is no need to first tear off pieces of colored paper; you can do it differently. Tear-off appliqué from colored paper is performed as follows:
- a large colored sheet is placed on a sheet of cardboard;
- press a piece of paper to the tape with the blunt tip of a pencil;
- then tear the paper off the cardboard;
- again place a large colored sheet on the cardboard base and repeat the steps.
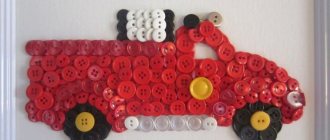
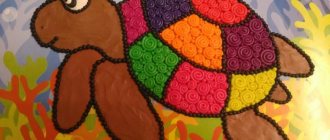
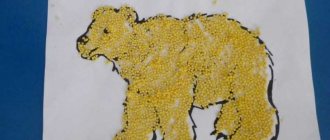
The finished cut paper applique will consist of many individual colored fragments fixed on cardboard using double-sided tape. For example, a cut paper applique “Autumn” involves the use of different colors. The selection of shades depends on the creative imagination of the child who performs this task. Some kids who work in patchwork technique have appliqués full of different colors, while others choose only yellow shades for their activities.
Rainbow in the clouds
You will need: colored cardboard, scissors, glue stick, cotton wool, stapler.
Master Class
- Cut 7 strips of paper of different colors so that each piece is shorter than the previous one. The red stripe should be the largest and the purple stripe the smallest.
- Arrange the stripes in the following order: red, orange, yellow, green, blue, indigo and violet.
- Fasten the strips of paper together using a stapler.
- Roll 6 cotton balls.
- Glue 3 cotton balls at the base of the rainbow as clouds.
Rainbow in the clouds is ready!
Types of tear-off appliqués
Tear-off paper applique has become so popular and in demand that numerous varieties have begun to appear. For example, in elementary school, teachers began to use a special technique - handigyrim. Its specificity lies in the fact that special handmade paper (handi) produced in Korea is used for the work. When creating an appliqué using the cutting technique, you first need to wet the pieces of paper in water, then twist them and fill the contours with these “sausages.” As a result, the effect of watercolor painting is observed.
Corrugated paper aster
How to wash a crystal chandelier- Secrets of builders: working with couplings
- DIY New Year's crafts - 9 best options
You will need: corrugated paper of purple, yellow, green and light green, scissors, wire, glue gun, pencil, ruler, watercolor paints, brush.
Master Class
- Prepare a strip of purple corrugated paper 4 cm wide.
- Tint one edge of the strip with purple paint and set aside to dry.
- Fold the strip several times.
- Make cuts along the unpainted edge. The first blank is ready.
- Make the second blank in the same way, only take a purple strip 6 cm wide.
- Prepare a strip of yellow paper 3 cm wide.
- Fold the yellow strip several times and make cuts.
- Wrap the wire with a light green piece of corrugated paper and secure with glue. This will be the stem.
- Wrap a yellow blank around the end of the stem - these will be the stamens.
- Twist the ends inside the purple piece, which is 4 cm wide, using a pencil.
- Step back from the base of the stamens and glue the petals.
- Take a 6cm wide purple blank and wrap it around the bud as shown in the photo.
- Twist the ends of the petals and straighten the middle.
- Cut out 6 sepals from green paper, then glue them on.
- Cut 6 long leaves of different sizes from light green paper and glue them to the stem.
The corrugated paper aster is ready! You will find even more flowers HERE.
I recommend watching this video!
Jobs for kids
A simple applique made from torn pieces of paper can be done even by children of 2-3 years of age. At such a young age, not all children know how to use scissors, glue, or make beautiful and straight lines. To show your child’s creative abilities at this time, the ideal option would be applique and mosaic made from torn pieces of paper. The baby's fingers will develop, and in the future he will not have difficulties with writing skills.
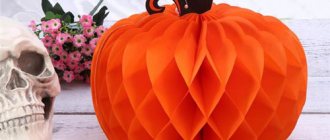
Pumpkin
You will need: rolls of toilet paper or paper towels, scissors, twine or rope, stick, pva glue, for decoration - glitter or book pages.
Master Class
- Cut the sleeve into circles.
- Apply glue to one piece, sprinkle with glitter or glue a piece of page and leave to dry.
- Decorate with glitter or book pages with every detail.
- Gather the circles onto twine to form a pumpkin.
- Glue the stick into the middle of the pumpkin.
The pumpkin made from bushings is ready! You can find even more crafts made from bushings HERE.
The main differences between patchwork techniques
Ordinary pictures require the use of a variety of ready-made templates. The child must first transfer them to paper of the desired color. Armed with scissors, he carefully cuts out all the blanks. If your baby has not yet learned how to hold scissors correctly, it will be difficult for him to work with them. As a result, he will not see the beautiful application and will be upset.
At the age of 4-5, children experience their first transitional period, so psychologists do not advise choosing tasks that can hurt the child. Having experienced failures at this time, he will not be able to tune in to positive growth or be motivated to demonstrate creative abilities. An application made from torn pieces of paper “Autumn Tree” is an excellent chance to avoid failures associated with using scissors in your work.
Crafts on the theme of autumn for school
Crafts on the theme of autumn for school are in many ways similar to those made in kindergarten. The difference lies largely in whether the child makes them himself or with the help of his parents. Simple crafts are suitable for DIY. The eyes will come to the rescue - they will make any craft more lively and expressive.
With due diligence, these mushrooms are also not difficult for a child to make on their own.
It’s more difficult to do these options yourself, in many ways you will need the help of parents, but joint creativity brings us together.
Such crafts are suitable for competitions and require imagination from the performer. How do you like these ideas?
Photos of crafts on the theme of autumn for the home
It is not at all necessary to make crafts just because they were assigned in kindergarten and school. Many of them can be made simply to decorate your home. These completely unconventional ideas will amaze you with their beauty and give you unique pleasure and lift your autumn mood.
Dry leaf applications don't have to be simple. Sometimes they become real paintings - masterpieces. Here are just a few ideas.
Wreaths have already become a traditional home decoration, and in the autumn they can also be a small work of art.
For those who like to sew or knit, the ideas might be something like this.
If you don’t want to do anything complicated, but need to create an atmosphere, garlands of leaves or fabric of appropriate colors are suitable.
This pumpkin craft is not at all difficult to make - you will need glue and a flexible pipe for extraction. Bend the pipe to create a pumpkin shape and then spray paint it. Add a stalk - a wine cork or a suitable twig, and decorate the craft with leaves.
This miniature will delight the eye for many years. Of course, it is not so easy to make, but the result is amazing.
This kind of fun pampering with photographs will make long autumn evenings truly creative.
Candles will bring comfort on cold evenings:
A few more craft ideas for adults and children
Which crafts did you like the most?
My name is Nadezhda, I am a mother of many children. I love children and am actively involved in their development. At one time, I was looking for a site where all the information on children’s development, ideas for crafts, and poems for memorization would be collected. And also the inspiration that all mothers need, because being a mother is not always easy. Now I know such a site - I created it myself))) “Mom can do anything!” This is not just a website, this is my motto in life.
Example of tear-off technique
Have you decided to spend a free evening with your child and prepare a gift for dad for his birthday? In this case, choose a picture option, stock up on colored paper, cardboard, glue in the form of a pencil and start creating. We offer a work plan for those who decide to create a “color masterpiece.”
At the first stage, you need to select a background of thick cardboard. If the applique is associated with autumn, you can use blue, white, gray dense material. Pay special attention to its density, since when working with glue, the base will become saturated with it and will not be able to withstand the entire application.
Now you can proceed to selecting a pattern for the future application. Have you decided to make a picture dedicated to late autumn? In this case, you can use a tree or flowers as a base design. First, it is important to draw the outline of the future picture onto the base with a pencil. For example, when choosing an autumn theme, you can mark a tree trunk, branches, and a place for leaves on cardboard. If the application is made by a schoolchild, in addition to the tree, the base depicts birds flying south and the contours of clouds.
The algorithm is similar to coloring different images in a coloring book. But working with pieces of paper does not involve painting, but gluing the fragment with paper of the desired color. In the first task, parents or a teacher can help the child, prepare colored pieces of a certain size for him, and show the child how to properly glue them inside the outline.
First, large pieces are selected, and each of them is glued separately. Then small pieces are used to fill the remaining space in the circuit. Do not forget while working that it is important to select fragments not only by parameters, but also by color. The task of adults is to control that during work the baby does not go beyond the boundaries of the intended contour. Otherwise, the application will turn out untidy and ugly.
Corrugated paper mushrooms
You will need: corrugated paper, scissors, glue, paper straw, honeycomb paper, paints as desired.
Master Class
- Check out the mushroom template.
- Cut 2 rectangles from corrugated paper.
- Form a mushroom cap by gluing them together as shown in the photo.
- Cut out a small circle of corrugated paper and glue it in the center, covering the hole in the cap.
- Take honeycomb shaped paper, fold it several times and cut out a semicircle. Make 2 of these multi-layer blanks.
- Glue the semicircles together and form mushroom plates as shown in the image.
- Glue the plates to the bottom of the mushroom cap.
- Cover the straw with corrugated paper and glue it as a mushroom stem.
- Make a whole collection of mushrooms of different sizes.
- If desired, paint or tint them.
Corrugated paper mushrooms are ready!
Where to get templates
The easiest option is to draw the outlines for the future application on cardboard yourself. In addition, you can use ready-made templates by purchasing a special set. Such kits include not only several thick bases with printed pictures, but also sheets of colored paper and glue.
If desired, you can also print the pictures using a computer and printer. The children themselves can also take part in making the outline of the future applique.
You won’t have any difficulties tearing the paper; you can turn this activity into an exciting game. If you carefully examine the finished work, it looks like a mosaic. School-age children, when gluing small pieces of paper, leave practically no empty spaces between them. Therefore, their work looks like a real piece of patchwork art. Children do not immediately master the basics of this interesting work, but parents or educators can always come to the rescue.
Crafts on the theme of autumn with your own hands: 70 photos
Golden autumn has arrived, which means it's time for long evenings at home due to bad weather. We invite you not to waste time, but to get creative. DIY crafts on the theme of autumn will be useful for both mothers of children in kindergartens and schoolchildren, and complex compositions will perfectly decorate the house and make it cozier and warmer. Such crafts can reduce autumn depression, because any kind of creativity calms the nervous system.
- Autumn craft ideas for kindergarten
- Crafts on the theme of autumn for school
- Photos of crafts on the theme of autumn for the home
Idea 1. Autumn topiary
Topiary is a decorative tree that can be used to decorate a dining table, mantel, or front door area. To make it, you can use natural or artificial materials, for example: leaves, berries on twigs, acorns, cones, chestnuts, flowers, dried citrus slices, as well as felt, sisal, linen and whatever your imagination tells you. In the next slider you can see several examples of such autumn crafts.
Next, we present to you a simple master class on making an autumn decorative tree from artificial leaves and berries.
- Clay pot;
- Wooden stick or branch;
- Two polystyrene or floral foam balls;
- Materials for decorating the crown;
- Dry moss (you can replace it with sisal);
- Glue gun and several glue sticks;
- Scissors;
- Side cutters or pruning shears;
- Acrylic paints for painting the trunk, ball and pot (optional).
Step 1. Cut a hole in the base ball with a sharp tool for the barrel, about a third of its diameter deep. Place a drop of hot glue into the hole and insert the barrel into it.
Step 2: Insert the second ball into the pot. If the ball does not sit tightly enough in the pot, place newspaper around it. Cut a hole in the ball for the trunk, 2-3 cm deep. Insert the trunk with the crown into the hole and adjust its length. Next, drop glue into the hole of the ball, place the barrel in it and begin to fill the hole with glue, placing small pieces of paper around the barrel. This is necessary so that the hot glue does not deepen the hole too much.
Step 3: Paint the pot the color you want if you don't like the original look. In this project, the pot was painted with spray paint in a dark bronze shade from Rustoleum (sold in construction stores, for example, in Leroy Merlin).
Remember that the design of the pot should be simple and unpretentious so as not to distract attention from the crown. If necessary, paint the barrel and/or balls at this stage. It is advisable to paint the balls so that the gaps between the decorative details are invisible.
Step 4. While the paint on our blank is drying, sort the decorative parts by type and size. If you use artificial leaves, flowers and berries with a wire base, then when cutting them, leave “stems” about 2 cm long. This is necessary in order not only to glue the parts, but also to stick them into the ball - then they will hold more securely . If the “stems” do not have wire, then it is better to cut the parts “at the root”.
Step 5. Now it's time for the fun part - creating the crown. First, evenly distribute and glue the largest parts onto the ball, then the middle ones. Finally, fill in the gaps with small embellishments.
Step 6. Well, that's all, all that remains is to decorate the ball in the pot with dry moss or sisal, after treating it with glue.